Shadow DOM的样式
我们已经可以使用原生的操作DOM的方式和使用模板的方式来创建Shadow DOM了,但是创建出来的毕竟只有HTML,是时候用CSS来修改下他们的样式了。
一、样式封装
前面曾说过,正常DOM的样式是不会影响到Shadow DOM中的样式的。例如:
<style type="text/css">
.red {
    color: red;
}
</style>

<p class="red">hello world</p>
<div id="box"></div>
var oBox = document.querySelector('#box');
var shadowRoot = oBox.createShadowRoot();
shadowRoot.innerHTML="<span class='red'>11111</span>";我们使用了red样式来使文字的颜色变为红色,但是页面显示的并不是我们想的那样。

在Shadow内部的元素并没有受到这个样式的影响。于是我们尝试在添加元素的时候加入style样式。
var oBox = document.querySelector('#box');
var shadowRoot = oBox.createShadowRoot();
shadowRoot.innerHTML="<span class='red'>11111</span><style>span{color:blue;}</style>";
此时,Shadow 中的元素的颜色变成了蓝色,也就是起作用了。
这种作用域化的特性使得我们可以使用局部的、组件化的思想来考虑书写CSS样式了。
二、宿主样式(:host)
有时我们需要给宿主元素增加些样式,你可能会想到在外部增加,当然这不符合组件化的思想,所以:host样式就有他的用处了。
/*额外在外部增加一个div的样式*/
div {
    font-weight: bold;
}
var oBox = document.querySelector('#box');
var shadowRoot = oBox.createShadowRoot();
shadowRoot.innerHTML="<span class='red'>11111</span><style>\
:host {\
border: 1px solid #ccc;\
width: 200px;\
height: 100px;\
}";
此时,宿主对象的样式被改变了。
此时我们发现Shadow DOM内部的元素多了个粗字体的样式。选中内部的span元素,在Element下的右侧的样式面板中,我们发现:

由于宿主对象在外部的CSS样式表中被渲染成了粗体显示,而这个属性是有继承性的,导致Shadow DOM内部的span元素也继承了这个属性。
注:Shadow DOM并不是真正不受外部影响的。样式的优先级同普通DOM元素样式的规则。
三、宿主样式状态
既然:host样式可以通过innerHTML添加到Shadow DOM中,那么同样可以放在templete中引入Shadow 内部。
有时我们需要给宿主元素添加例如悬浮的样式,我们可以:
<div id="box">world</div>

<template class="box-template">
    hello,<content></content>
    <style>
        :host {
            border: 1px solid #ccc;
            width: 300px;
            height: 200px;
        }
        :host(:hover) {
            border: 1px solid red;
        };
    </style>
</template>

<script type="text/javascript">
var oBox = document.querySelector('#box');

var shadowRoot = oBox.createShadowRoot();
var template = document.querySelector('.box-template');
shadowRoot.appendChild(document.importNode(template.content, true));
</script>
当鼠标悬浮到宿主对象时,边框就会变成绿色的。
三、宿主样式中的类型选择器
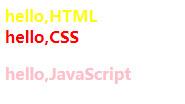
我们通过增加:hover伪类给宿主元素增加悬浮样式,注::host也是伪类。我们可以将:host作用于多个元素上来改变样式。
<body>
<div class="html">HTML</div>
<div id="css">CSS</div>
<p>JavaScript</p>

<template class="box-template">
    <style>
        :host(*) {
            font-weight: bold;
        }
        :host(.html) {
            color: yellow;
        }
        :host(#css) {
            color: red;
        }
        :host(p) {
            color: pink;
        }
    </style>
    hello,<content></content>
</template>
</body>

<script type="text/javascript">
var HTMLRoot = document.querySelector('.html').createShadowRoot();
var CSSRoot = document.querySelector('#css').createShadowRoot();
var JSRoot = document.querySelector('p').createShadowRoot();

var template = document.querySelector('.box-template');
HTMLRoot.appendChild(document.importNode(template.content, true));
CSSRoot.appendChild(document.importNode(template.content, true));
JSRoot.appendChild(document.importNode(template.content, true));
</script>
我们发现,可以根据类名、ID、属性等等来进行匹配选择——任何有效的 CSS 选择器都可以正常工作。
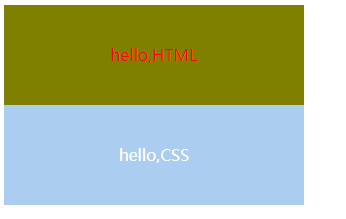
四、主题化
<div class="html">HTML</div>
<div id="css">CSS</div>

<template class="box-template">
    <style>
        :host-context(.html) {
            width: 300px;
            height: 100px;
            line-height: 100px;
            text-align: center;
            background-color: olive;
            color: red;
        }
        :host-context(#css) {
            width: 300px;
            height: 100px;
            line-height: 100px;
            text-align: center;
            background-color: #abcdef;
            color: #fff;
        }
    </style>
    hello,<content></content>
</template>

<script type="text/javascript">
var HTMLRoot = document.querySelector('.html').createShadowRoot();
var CSSRoot = document.querySelector('#css').createShadowRoot();

var template = document.querySelector('.box-template');
HTMLRoot.appendChild(document.importNode(template.content, true));
CSSRoot.appendChild(document.importNode(template.content, true));
</script>
使用 :host-context() 的语法我们可以基于内容元素修改我们组件的外观,他可以选择影子宿主的祖先元素的(context的祖先)。这种使用方式类似于子类选择器的反向使用,就像.parent < .child这样,而在Shadow DOM中就可以这么使用。
五、分布节点
来自页面并通过
<div id="box">
    <span>hello,world</span>
</div>

<template class="box-template">
    <style>
        :host {
            width: 300px;
            height: 100px;
            line-height: 100px;
            text-align: center;
            background-color: olive;
        }
        /* 给span加上样式,我们也许会这么写 */
        :host(span) {
            color: red;
        }
        /* 又或者这么写 */
        :host span {
            color: red;
        }
    </style>
    <content></content>
</template>
<script type="text/javascript">
var shadowRoot = document.querySelector('#box').createShadowRoot();

var template = document.querySelector('.box-template');
shadowRoot.appendChild(document.importNode(template.content, true));
</script>
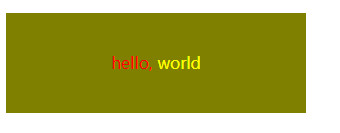
这两种给span增加样式的方法都是行不通的,分布节点的样式渲染需要用到 ::content 伪类选择器,将前面CSS代码中我们尝试给span添加颜色的样式换成
::content > span {
    color: red;
}
我们便可以得到:

样式成功的生效了。
六、::shadow
Shadow DOM的良好封装性是很有用处。但有时你可能会想让使用者给你的组件添加一些样式。使用 ::shadow 伪类选择器我们可以赋予用户重写我们默认定义的自由,如果用户这样做的话,他就可以打破影子边界的壁垒。
<style type="text/css">
#box::shadow #sign {
    color: red;
}
#box::shadow .cnt {
    color: yellow;
}
</style>
<div id="box">
    <span>hello,world</span>
</div>

<template class="box-template">
    <style>
        :host {
            width: 300px;
            height: 100px;
            line-height: 100px;
            text-align: center;
            background-color: olive;
        }
        span {
            color: green;
        }
    </style>
    <div>
        <p>
            <span id="sign">hello,</span>
            <span class="cnt">world</span>
        </p>
    </div>
</template>
<script type="text/javascript">
var shadowRoot = document.querySelector('#box').createShadowRoot();

var template = document.querySelector('.box-template');
shadowRoot.appendChild(document.importNode(template.content, true));
</script>